
I have been preparing for my OSCP exam. It’s a grueling 24 hour computer hacking test with no sleep. Some of the computers to hack are behind firewalls and require special tunnels to access. Setting up these tunnels would leave me scratching my head as one tunnel connects back through another, takes a left at Luxembourg and then connects to the remote port. I was able to make sense of making the tunnels once I adopted a naming convention that I detail below. However, given that this is an introductory essay, let me start by explaining ssh tunnels from the beginning.
The ssh service is a computer connection service that allows one to connect to another computer with a command prompt (also known as a shell or terminal). In addition to establishing the connection, the ssh service also encrypts the communication. Hence it’s name stands for Secure SHell – ssh. This allows an administrator to make changes to remote computers without having to physically travel to those computers which could be rooms or even countries away. Thus, ssh service is widely used in corporate environments. For an example, the command below connects from OLDHost to NEWHost. Every command then entered would affect the NEWHost computer just as if the user were physically at that computer. The connection is diagrammed in Figure 1 and an actual example shown in Figure 2 below.
OLDHost$ ssh user@NEWHost
Password: SuperSecret
NEWHost$
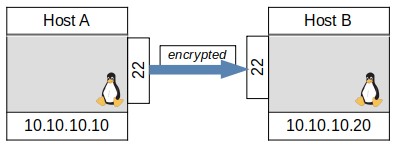
FIGURE 1, SINGLE SSH CONNECTION DIAGRAM
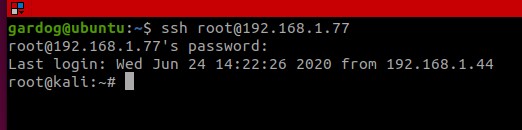
FIGURE 2, SINGLE SSH CONNECTION IN A TERMINAL
Because ssh is so useful, it is often allowed to pass through firewalls so administrators can reach remote computers. Typically, ssh uses port 22. For normal use this is still fairly secure as the passwords used for ssh are long and complex and don’t allow for realistic brute forcing. The problems for security comes if an attacker can get any access behind the firewall, they can use ssh to tunnel through the firewall from the inside bypassing it altogether. The attacker does this by setting up a tunnel that transmits other traffic through the ssh connection in either of two ways, port forwarding, and dynamic port forwarding.
I will start with explaining the first way, port forwarding.
CONNECTING TWO HOSTS:
It is prudent to begin with the simple two host solution below if Figure 3. In this example, Host A wants to access port 3306 on HostB, but HostB only allows connections to port 3306 from itself for added security. This is a perfect time to use ssh port forwarding so that your programs and tools on HostA can access port 3306 on HostB as if they were physically on HostB. All that is required is that there is a ssh server active on one of the hosts for which you have credentials and that you can reach that service from the other host. There are two flavors of port forwarding: local and remote. The local port forwarding binds a local port as the listening port for subsequent connections (this is the -L command), whereas the remote port forwarding binds the remote port of the remote host as the listening port for subsequent communications (this will be the -R command). The syntax of the command is shown below.
ssh -L localport:remoteIP:remoteport user@remoteIP
ssh -R remoteport:remoteIP:remoteport user@remoteIP

FIGURE 3, WHAT’S HAPPENING WITH TUNNEL THROUGH SSH.
The first port after the -R/-L will be bound in a listening state by the ssh command and is to be used for subsequent connections to the remote service. This and which Host has a ssh server determines whether one should use the -L or -R options. We assume both hosts have a ssh server running and we have credentials for both. We choose to bind HostA port 2222 to HostB port 3306 through a ssh tunnel. We can use ssh from either Host A or Host B to construct the tunnel.
From HostA$ ssh -L 2222:10.10.10.20:3306 user@10.10.10.20 (enter SuperSecret password)
From HostB$ ssh -R 2222:10.10.10.20:3306 user@10.10.10.10 (enter SuperSecret password)
Both commands would bind HostA port 2222 to listen and forward anything to Host B port 3306 through the ssh tunnel, appearing as if it were from HostB. Which one you would use depends on for which host you have ssh credentials and which host has a ssh server operating. Figure 4 shows the connection as a red arrow form port 2222 on HostA to port 3306 on HostB. It also shows the ssh command in blue that established the connection through ssh on port 22. Figure 5 shows a simplified diagram which is more common of the new forwarded connection in red only. Though most diagrams will only show the forwarded ports, it’s important to remember that all communications between the hosts is encrypted and sent over port 22 only as seen in Figure 3.
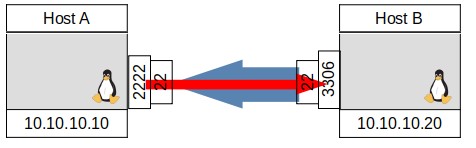
FIGURE 4, SSH COMMAND IN BLUE AND PORT FORWARD IN RED
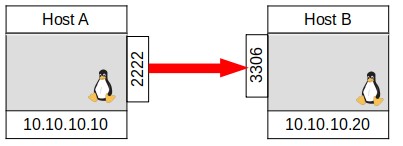
FIGURE 5, PORT FORWARD IN RED
Once the tunnel is setup, one could access Host B port 3306 by referring on Host A to 127.0.0.1 on port 2222. In this case, the command to access mysql would be:
HostA$ mysql -u user -h 127.0.0.1 -P 2222
Notice that HostB could not initiate a connection on HostB’s 3306 port to connect to HostA’s port 2222. This is because HostA’s port 2222 is bound in a listening state by the ssh tunnel. To enable connecting to HostB port 3306 to HostA port 2222, the commands would have to be reversed:
From HostB$ ssh -L 3306:10.10.10.10:2222 user@10.10.10.10
From HostA$ ssh -R 3306:10.10.10.10:2222 user@10.10.10.20
We should pause for a moment to consider the order in which we determine who connects and how. First you need a ssh server for which you have credentials. That is the user@HostAddress portion of the ssh command. Then, you need to determine where you can connect to that server from. In this case with only two hosts, it’s obviously the other host that doesn’t have the ssh server.
Now that you know from where you will make the ssh command, determine if you want it to connect to a local port on that host to access on the ssh server host with the -L option, or if you want to ssh server to connect back to you with the -R option. It helps to draw a quick diagram anytime you use port forwards. I recommend including the ssh ‘blue’ arrow to help indicate which way the command is written and the ‘red’ arrow to indicate what direction the tunnel runs.
CONNECTING THREE HOSTS IN ONE COMMAND:
Now we’re finally at the point where the real confusion can happen – three hosts.In this typical scenario, we will have three hosts, and we want to connect from Host A to Host C.
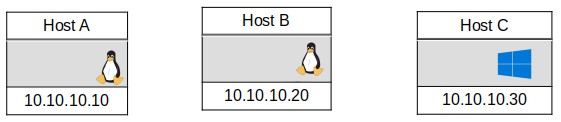
FIGURE 6, CONNECTING 3 HOSTS
Notice that there are three hosts involved, but the documentation for ssh only refers to local and remote ports. If HostA is the local, is the ‘remote’ port the port of HostB or HostC? It became more clearly to me when I invented the terms LOGTO as the third host description in the commands. With the new names, the ssh port forwarding commands becomes:
ssh -L localport:remoteIP:remoteport user@LOGTOIP
ssh -R LOGTOport:remoteIP:remoteIP user@LOGTOIP
Notice that now we can have precise terms for who is connecting to whom on which ports. Also notice that the first port is always related to the original ssh connection (whether the local or LOGTO), but the second remoteIP and remote port are free to be any host or port. If a user on Host A wanted to access a port 445 on HostC from HostB the most direct is to ssh from HostA to HostB with the following command.
From HostA$ ssh -L HostAPort:C-Address: portC user@B-Address
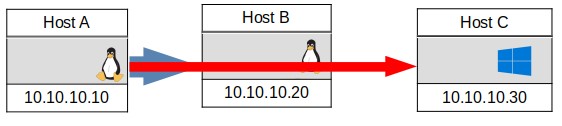
FIGURE 7, FORWARD REMOTE TUNNEL
The resulting tunnel is shown in Figure 7. However, this requires that HostB have a running ssh server and the user has ssh credentials to that server. This does not happen as often as one would like. If one has a terminal shell on host B, an alternate is to ssh From HostB to Host A, which the attacker has complete control over, to access a remote port on HostC.
From HostB$ ssh -R HostAPort:C-Address:portC user@A-Address
This would bind HostAport to listen and forward anything to HostC port portC through the ssh tunnel, appearing as if it were from HostB. This is a realistic scenario where there is a firewall between hostA and HostB. An attacker with a low privileged shell on HostB could gain access to HostC by redirecting through their own ssh server on HostA.
If the port you want to connect to is only listening on the localhost address of 127.0.0.1, then you need to use that as the IP address in the ssh forwarding command. When using the localhost address, 127.0.0.1, for the remoteIP (the middle IP address), it will be the localhost of the opposite of the port forward call. That is -L 3306:127.0.0.1:2222 user@HostA would forward to the localhost address of remote Host A on port 2222. The call -R 3306:127.0.0.1:2222 user@HostA would forward to the localhost address of the local Host making the ssh command on its port 2222. If I were to update the manual page form of the commands, I would write the following to remember what localhost, 127.0.0.1 would mean as the ‘remoteIP’ in the command in parenthesis.
ssh -L localport:remoteIP(logto):remoteport user@LOGTOIP
ssh -R LOGTOport:remoteIP(local):remoteIP user@LOGTOIP
Since this can get confusing, I suggest not using localhost or 127.0.0.1 in ssh commands unless necessitated by a localhost listening port.
The flexibility in the ssh commands allows for many useful configurations. We’ve already seen accessing local resources remotely with the two hosts example. We’ve also seen bypassing firewall restrictions with the three hosts example. It’s also possible to connect two local ports on the local host by ssh tunneling to a second remote host. Or conversely connecting two remote ports by ssh tunneling from a local host.
Now before I move onto a real world example, there are a few considerations. Usually when setting up a tunnel, you would want to leave the tunnel running and you would not want a shell prompt. This is accomplished by adding the -f and -N options. Further if this is the first time you are connecting to a particular ssh server or client, you will be asked two things: If you want to accept the connection based on the fingerprint, and if you want to add the host to the known hosts file. Normally these options require a shell prompt for an answer which can cause problems. They can however be bypassed with the options -o “StrictHostKeyChecking=no” -o “UserKnownHostsFile=/dev/null” in the ssh command.
Another real-world consideration is that unusual ports may be blocked. So while my examples will show using ports like 3390 and 2222, it would be better to use well known ports that are likely needed by the host and thus not blocked. Examples of alternative ports to use are 25, 53, 80, 88, 110, 143, 443, 993, or 995. It’s best to find a port which isn’t already in use by the host but is common enough to be allowed through.
Let’s consider a typical scenario where an attacker has low privileged access to a Linux host on a different network ( 10.10.0.X), but they want access to a third Windows host that only allows RDP connections from the local network. This is shown in Figure 8. The attacker can’t access RDP through to the Windows host directly due to firewall restrictions allowing only connections from the same network of 10.10.0.X on the Windows host (additionally, the firewall may not allow RDP access at all).
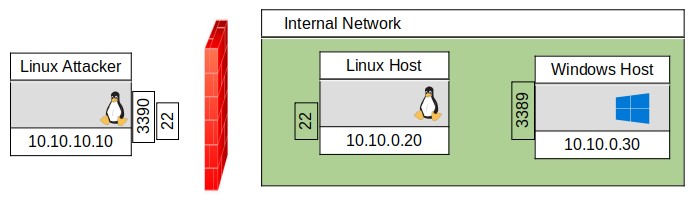
FIGURE 8, ACCESSING INTERNAL NETWORK
Now, if we had a ssh server on the Linux Host and had credentials for that server, we could use a terminal from the Linux Attacker with a -L , local, option
LinuxAttacker$ ssh -f -N -o “StrictHostKeyChecking=no” -o “UserKnownHostsFile=/dev/null” -L 3390:10.10.0.30:3389 user@10.10.0.20
However, many times an attacker does not have the ability to ssh onto the Linux host, but only has a shell prompt from the Linux Host. In this case, the attacker only needs to ensure that the ssh service on their Linux Attacker host is operating, and then they would enter in the command prompt from the Linux host:
LinuxHost$ ssh -f -N -o “StrictHostKeyChecking=no” -o “UserKnownHostsFile=/dev/null” -R 3390:10.10.0.30:3389 user@10.10.10.10
The tunnel is now configured as shown in Figure 9.
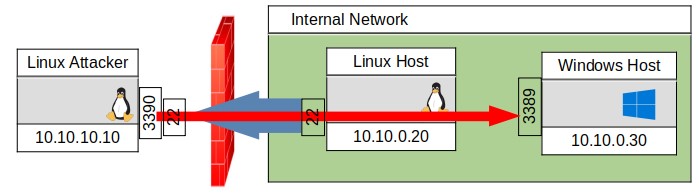
FIGURE 9, SSH TUNNEL TO INTERNAL HOST
Using either of these commands would then allow the attacker to connect to the remote Windows Host on port 3389 by connecting to the Linux Attacker’s localhost address of 127.0.0.1 on port 3390.
LinuxAttacker$ rdesktop -u user -p password 127.0.0.1:3390
Local and remote ssh forwards are a great way to access remote ports because of the encryption and the speed and stability of the connection.
Dynamic Port Forwards:
There is another type of port forwarding when one doesn’t know which port one would want to connect to: dynamic port forwarding. Once a dynamic tunnel is setup, the other end of the tunnel would examine which type of application is sending information and send it to the normal port for that application. Dynamic forwarding also allows for scanning of internal networks. Because the tunnel must run at the application level, many layer 3 and below operations cannot be passed through like ping, and -sS scans in nmap. This is also known as a socks4 proxy as it occurs at on the OSI model of networking at the 4th level and above. I show a diagram of the connection without a port below in Figure 10.
Also note that I have only provided examples of proxychains for the Linux environment as most users trying to bypass firewall restrictions use Linux. There are versions of ssh and other tools for Windows that can perform the same ssh port forwards and dynamic port forward tunnels, but I leave that to the reader for further investigation.
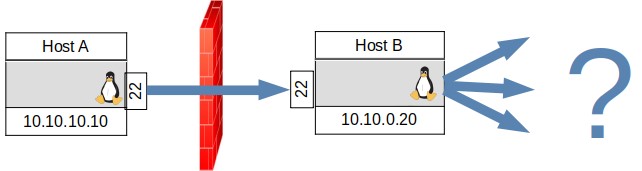
FIGURE 10, DYNAMIC PORT FORWARDING
If I were on HostA and I could ssh into HostB, then I could scan and connect to any host past the firewall. The command to create the dynamic tunnel can be in two forms depending on which host one is connecting to and from.
HostA$ ssh -D localport user@10.10.0.20
HostB$ ssh -R remoteport user@10.10.10.10
Note that the -D option has been included in the ssh command for a long time, but only modern versions of ssh clients have the -R remoteport option for dynamic port forwarding remotely.
One more step is necessary to use the dynamic port, one must configure the proxychains service by editing the /etc/proxychains.conf file to add the last line: socks4 127.0.0.1 localport. This tells the command proxychains that we are running a socks4 proxy on the localhost port at ‘localport’. Then, one can run any command on the remote host by prepending the command proxychains to it. For example:
HostA$ proxychains nmap –top-ports=20 -sT -Pn 10.5.5.20
HostA$ proxychains nc 10.10.0.30 25
Let’s see commands for a realistic scenario. Let’s revisit our three hosts scenario with an attacker with a shell to Linux Host behind a firewall. Let’s say that this firewall allows ssh on port 22 to Linux Host.
Linux Attacker Firewall Linux Host Windows Host
10.10.10.10 10.10.0.20 10.10.0.30 port
The simplest way requires the Linux Host to have a ssh service running for which we also have credentials. This would normally require root privileges to make a user and start the ssh service. Then the following commands would setup the dynamic port forward tunnel.
LinuxAttacker$ ssh -D 3333 -f -N -o “StrictHostKeyChecking=no” -o “UserKnownHostsFile=/dev/null” user@10.10.0.20
LinuxAttacker$ echo socks4 127.0.0.1 3333 >> /etc/proxychains.conf
The newer -R version of dynamic forwarding is quite useful as it does not require root access on the Linux Host, merely an unprivileged shell. One would start the ssh service on the Linux Attacker and then connect to it from the unprivileged Linux Host with the command below.
LinuxHost$ ssh -R 3333 -f -N -o “StrictHostKeyChecking=no” -o “UserKnownHostsFile=/dev/null” user@10.10.10.10
LinuxAttacker$ echo socks4 127.0.0.1 3333 >> /etc/proxychains.conf
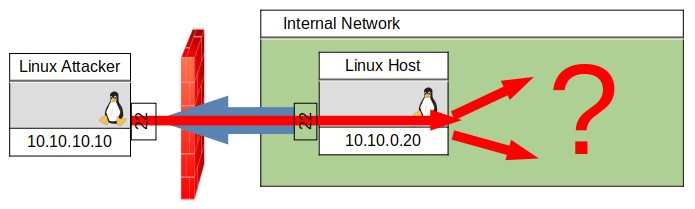
FIGURE 11, DYNAMIC PORT FORWARD TO INTERNAL NETWORK
I have diagrammed the -R dynamic tunnel connection in Figure 11. Now no matter which way you made the dynamic tunnel, many different possibilities exist for discovery on the remote network. This is an example of how you could discover hosts an the internal network and interact with them.
LinuxAttacker$ proxychains nmap -p 445 10.10.0.1-255 (to look for Windows hosts by their SMB shares)
LinuxAttacker$ proxychains nmap –top-ports=20 -sT -Pn 10.10.0.30 (scan of a found Windows Host)
LinuxAttacker$ proxychains nc 10.10.0.30 25 (to interact with smtp on the Windows Host)
So now after being able to setup the dynamic port forward tunnel, you have scanned the internal network for a windows host, scanned ports on that particular host, and now can interact with it’s SMTP mail program on port 25.
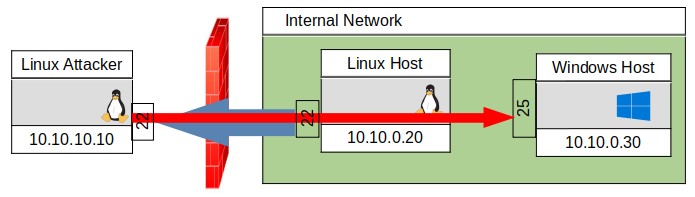
FIGURE 12, DYNAMIC PORT FORWARD SCAN AND DISCOVERY OF INTERNAL NETWORK
Conclusion:
We have seen how ssh allows us to encrypt traffic, tunnel other protocols, and bypass firewall restrictions. Further study can show other useful features such as key authentication and using ssh and port forwards from Windows hosts. This will all be necessary if you’re planning on taking the OSCP test. It’s also used for most remote systems administration tasks, so it’s a necessity for system administrators too.
The parts that helped me understand ssh port forwards the most was
- Finally figuring out the LOGTO / remote difference
- Finding the -R dynamic port forwarding option
- Diagramming before typing in commands
Port Forward Tunnelling Syntax:
ssh -L localport:remoteIP(LOGTO):remoteport -f -N user@LOGTOIP
ssh -R LOGTOport:remoteIP(local):remoteport -f -N user@LOGTOIP
Dynamic Tunneling Syntax:
ssh -D localport -f -N user@host
ssh -R remoteport -f -N user@host
( and remember: -o “StrictHostKeyChecking=no” -o “UserKnownHostsFile=/dev/null” )
The example I showed in Figure 12 actually happened to me. I was able to exploit a vulnerable web application in a company’s webserver. From there without needing privilege escalation, I was able to setup my reverse dynamic port forward with the -R option. Slow and careful scanning of the hosts revealed some computers that looked suspiciously like the heads of the company. Luckily, I found an available SMTP port that didn’t require authentication.
So what? I can write an email, who cares? Well, I could also include a malicious attachment to that email and it will look genuine from within the company’s system. Making the subject line about the IT department also makes sure some IT admins will likely open it. A great way to infiltrate – it was a good day for me, and if you apply this technique, I hope it will be a good day for you too!!
Gary Weessies, CISSP
Cybersecurity Consultant